Find my people (Radar)
Radar is a plan-position (“PPI”) scope: you sit at the centre and every node that has shared a position is drawn as a blip at its range and bearing from you. It turns the distance and bearing that Nodes and Tracker print as text into one glance, which is what you want when you are looking for the rest of your group at a festival or on a trail.
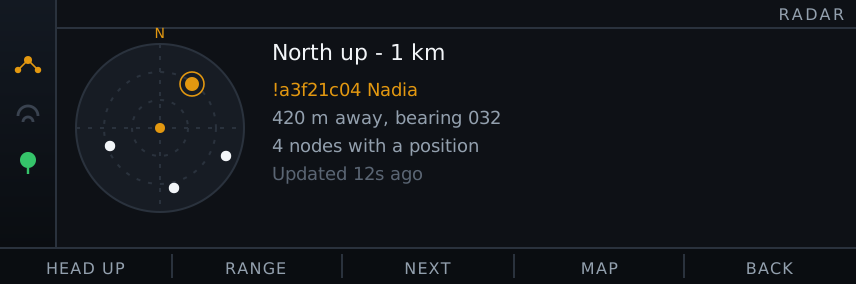
You need your own GPS fix to place the blips. Without one the scope stays empty and the side panel
says Need your own GPS fix to place nodes.
The scope is north-up until you press F1
Section titled “The scope is north-up until you press F1”It starts north-up and stays north-up whether or not a compass is fitted. F1 switches between north-up and heading-up, and the label shows which one the next press will select. In heading-up the scope turns so the way you are facing points to the top, taken from the IMU compass when it is calibrated and fresh, which holds while you stand still. With no compass heading it uses your GPS course over ground instead, which only exists while you move faster than 1 knot, and with neither it stays north-up.
The title line names the orientation actually in use, so you never have to guess which source won:
| Title | Meaning |
|---|---|
North up | North-up, the default, or selected again with F1. The compass is not consulted at all in this mode |
Heading up | Turning with the compass |
Course up | No compass heading, turning with GPS course over ground |
North up (move) | Heading-up asked for, but there is no compass to wait for: imu_enabled is off, nothing answered on the SAO bus at boot, or the magnetometer die is silent. Start moving and the GPS course takes over |
North up (cal) | The compass is sampling but nothing has been calibrated: sweep it in the Compass app |
North up (cal off) | A calibration is saved but mag_cal_use is off, so no heading is published. Turn Use saved calibration back on in Settings |
North up (wait) | The compass is running but no sample has arrived for more than 2 seconds |
The last four are the four different reasons a heading-up view shows north, and they want four different things from you. Compass has the same table with the fix for each.
Press F2 (Range) to step the distance the outer ring represents: 200 m, 1 km, 5 km, or Auto. Auto fits the farthest positioned node. A node beyond the current range is pinned to the rim.
Reading the scope
Section titled “Reading the scope”- The amber dot in the centre is you, with a short tick marking the up direction
- Each other node is a dot at its range and bearing. The side panel names the nearest node with its distance and bearing, and counts how many nodes are on the scope
- Press F3 (Next) to highlight nodes in turn; the highlighted node is drawn in amber
The blips come from the same node database the Nodes and Tracker apps use, so a node appears as soon as it has broadcast a position.
F4 draws an offline map behind the blips
Section titled “F4 draws an offline map behind the blips”Press F4 (Map) to draw an offline vector map, roads and water, behind the blips, so you can see which
street a node is on and not just its bearing. The overlay rotates and scales with the scope: it stays
aligned with the blips in both north-up and heading-up, and follows the F2 range. Roads are drawn dim
and water in cyan, kept faint so the amber blips stay dominant. The label shows Map when off and
Map* when on, and the choice is remembered in the Map overlay setting (radar_map) under Radar in
Settings.
The map is offline and local: you build a .vmap file for your area on a PC and upload it to the
badge over WiFi. Until you do, F4 has nothing to draw and the side panel says
No map uploaded (see /map). See Offline maps for the one-time
setup.
The overlay only redraws when the view actually changes, when you move, turn, or change range, rather than on every refresh, so it stays cheap even with a busy map.